Mob Capabilities Editor
-
Mob Capabilities Editor Tutorial
Getting started
Start by launching your game with Epic Fight installed. From the main menu, click on the 'Mods' button and search for 'Epic Fight.' Once you find it, select it and click on 'Config.' This will open the editor window, allowing you to make your desired changes.
Select your entity:

There are two ways to patch an entity. The simpler option is to select from a list of presets, featuring entities that Epic Fight has already redesigned from the vanilla game. Alternatively, you can take a more detailed approach, fully customizing the entity to suit your vision.
Easy Setup
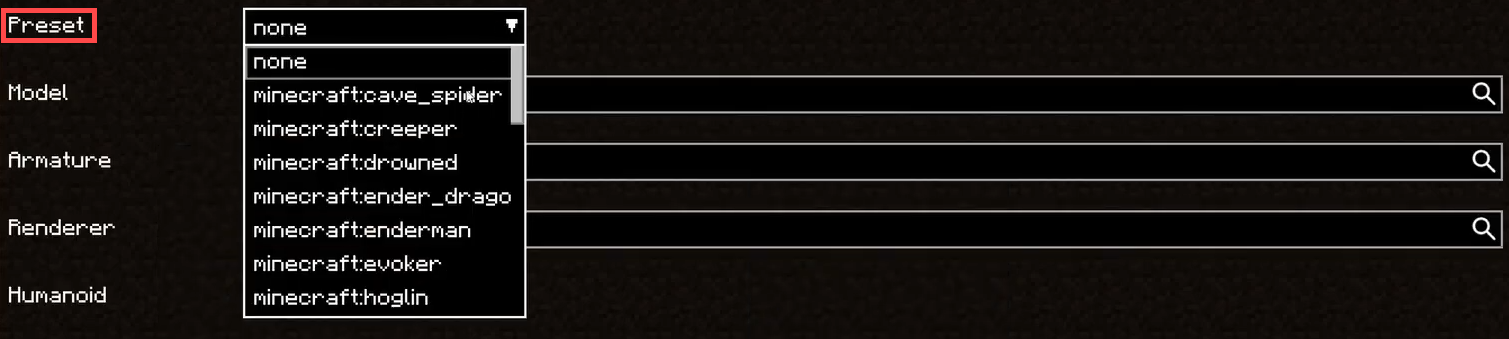
Similar to the Custom Entities Datapack's Easy Setup, the mob capability options provide a variety of presets for players to choose from. To view the available presets, click on the drop-down menu to the right of the 'Presets' option.
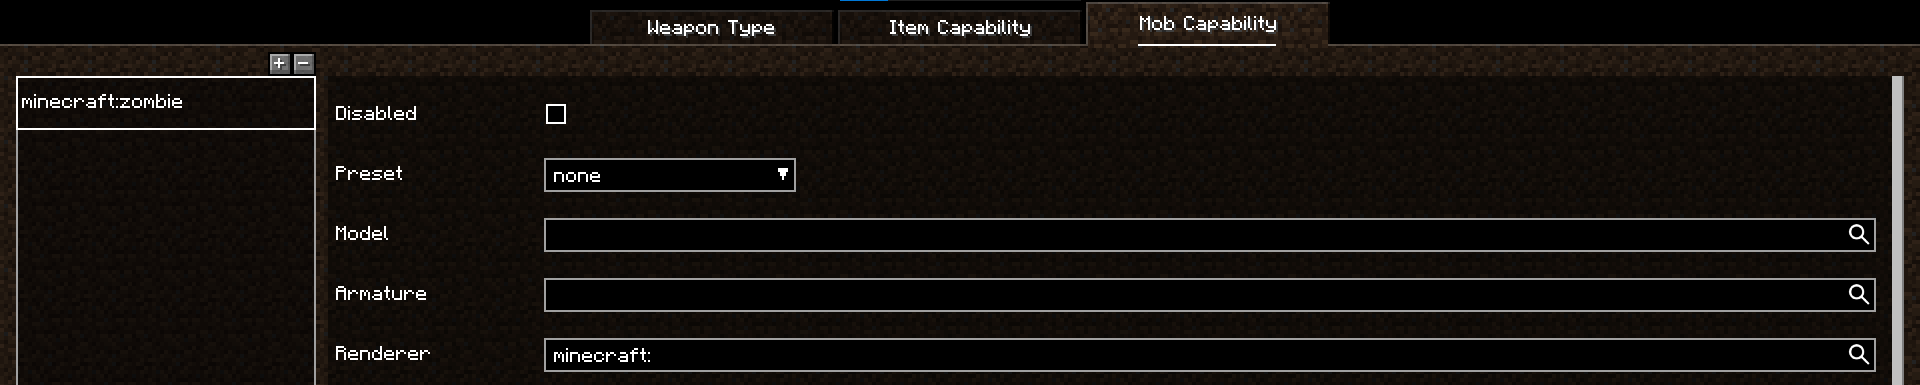
You can also disable already patched entities provided by Epic Fight. For example, you may choose to disable certain vanilla entities, such as the Zombie, Skeleton, or Enderman.
Detailed Setup
Setting up the basics
- Model: This serves as the blueprint for the entity's geometry, defining its physical structure and appearance. Think of it as the body of the mob & how it looks in terms of shape, size, and design.
- Armature: Often referred to as the skeleton of the entity, the armature is responsible for enabling movement and animations. It acts as the framework that connects different parts of the model, allowing it to bend, stretch, or perform complex motions seamlessly.
- Renderer: The renderer determines how the entity is displayed within the game environment. It handles textures, colors, lighting, and other visual elements, ensuring the entity appears and behaves cohesively with the game's aesthetic.

Each pillar plays a vital role, and together, they form the complete structure of a custom entity. Mastery of these elements allows for the creation of unique and engaging entities that enhance the gameplay experience.
Unlocking Features and Functionality
When creating or customizing entities in your project, you can assign various properties to them. These properties act as customizable traits that enable unique behaviors and features for your entities, bringing you closer to achieving your desired functionality. Below, we explore some key properties and their impact on entity behavior:
- The Humanoid property group defines whether an entity can utilize tools or other held items. Enabling this property adds a new layer of interactivity by:
- Allowing the entity to use tools and weapons, such as swords, pickaxes, or bows.
- Changing the entity's attack and living animations based on the item it is holding. For example, a humanoid entity with a sword will use a different attack animation compared to one holding nothing or a bow.
- The Factions property determines the alliances and relationships between entities in the world. It sets up dynamic interactions, as described below:
- Entities belonging to the same faction will not attack or harm each other by default.
- Factions act as a group identifier for mobs, enabling cooperative behavior among allied entities.
- However, faction members can still attack each other if explicitly directed by their AI or other in-game events (e.g., provocation or player intervention).
Warning
Applying the "Humanoid" property to non-bipedal entities may lead to animation or behavior inconsistencies, so it’s recommended to use it primarily for entities with a humanoid form.
Sounds and Particles
To further enhance your entities, you can customize their behavior with specific sound and particle effects. These options allow for more immersive and dynamic interactions, tailoring your mobs to fit your gameplay environment. Below are the additional customization options explained in detail:
- The Swing Sound is the audio effect played when the entity performs an attack. This sound adds an auditory cue to the entity's actions, making combat interactions more engaging.
- For humanoid entities, the swing sound associated with the type of weapon they are holding takes precedence over the entity’s default swing sound.
- The Hit Sound is the sound effect that plays when the entity successfully damages another entity. It provides feedback for successful attacks and enhances the sensory experience during combat.
- Particles can be tailored to match the entity’s theme or attack style. For example, a fiery mob could produce flame particles, while a magical entity might create sparkles or glowing dust.
Defining Mob Attributes
Attributes define the core capabilities of your mobs, influencing their combat effectiveness, movement, and physical characteristics. Here's a breakdown of key attributes and their effects:
|
|
|---|---|
| Impact | Increases the stun duration applied to enemies when the mob successfully lands an attack. Ideal for mobs designed to interrupt or incapacitate opponents, giving them a tactical edge in combat scenarios. |
| Armor Negation | Enhances the mob's ability to deal damage to heavily armored entities by reducing the effectiveness of their defense points. Great to counter tanks or heavily fortified foes, ensuring they remain a threat regardless of enemy armor. |
| Max Strikes | Determines the maximum number of entities that can be struck in a single attack or swing. A mob with a high Max Strikes value can hit multiple targets at once, making it effective in crowd-control scenarios. |
| Chasing Speed | Increases the mob's movement speed while actively pursuing a target. Enables fast-paced or predatory mobs to chase down their prey effectively. |
| Scale | Adjusts the size of the mob, affecting both its visual model and physical armature (hitbox, animations, etc). Use for mobs that share a model but need a size distinction, such as making a Giant Zombie from a regular zombie model. |
| Stun Armor | Reduces the mob's susceptibility to stuns, making it more resilient in battle. Ideal for boss mobs or heavily armored creatures, ensuring they remain active and dangerous even against stun-heavy opponents. |
Animating Your Mob’s Lifecycle
Living animations bring life to your mobs by defining how they move, react, and behave throughout their lifecycle. These animations are tied to specific states and events, allowing mobs to respond dynamically to various situations
Entities typically have three main states during their lifecycle:
- Idle
- Represents the mob when it's stationary and not interacting with its surroundings.
- Walk
- Represents normal movement when the mob is wandering or navigating the environment without a target.
- Chase
- Represents the mob when pursuing a target aggressively.
You may also define stun animations, these bring a realistic and dynamic response to your mobs when they are temporarily incapacitated by external effects. These animations are tied to specific stun types and are crucial for ensuring the mob reacts appropriately during gameplay.
Each stun type can have its own unique animation, such as:
- Quickly freezing in place when stunned by any any damage (Short).
- A mob staggering backward when hit by a heavy attack (long).
- Collapsing briefly when knocked down (Knockdown).
- Landing after receiving fall damage (Fall).
Warning
If no animation is bound for a specific stun type, the mob will be immune to that stun. This behavior allows you to control which stuns affect your mob, creating opportunities for specialized resistances or vulnerabilities.
Combat Behavior
Once you've set up your entity's basic properties and animations, it's time to focus on its combat behavior, which determines how the entity fights, attacks, and selects its moves in various scenarios. In Epic Fight, combat behavior is driven by AI system that utilizes moveset layers and conditions to create dynamic encounters.
Understanding Combat AI and Moveset Layers
Combat AI uses layers of movesets, where each moveset consists of a set of attack animations & specific conditions for when those animations should be used.
Each moveset has a weight value, which determines its likelihood of being selected by the AI. Adjusting the weights allows you to bias the AI toward specific attack styles or prioritize certain moves.
Before selecting a moveset, the AI checks the first condition of each moveset. Movesets that fail this condition are excluded from being candidates.
Example
A "jump attack" moveset might require the target to be within a specific distance or the mob to be airborne.
Once a moveset is selected:
-
Marking Behaviors
- The AI marks the first behavior in the moveset. This serves as the starting point for the entity’s attack.
- It then attempts to proceed to the next behavior in the sequence, provided the next behavior’s conditions are met. -
Interceptable Movesets
- If the current moveset is interceptable, the AI can evaluate other potential movesets during the sequence.
- This creates opportunities for the AI to adapt dynamically during combat. -
Resetting on Failure
- If the AI fails to meet the conditions for the next behavior in the sequence, it resets to the first behavior unless the current moveset is set to loop.
- Looping Movesets: These repeat their behaviors until a condition is met or interrupted.
Combat Cycle:
- The AI continuously repeats this process if the mob has a valid target.