Item Capability
-
Item Capabilities Tutorial
Making the pack.mcmeta file
First, you'll need to create a pack.mcmeta file. Here's how to do it:
-
Create the File:
- Start by creating a new text file.
- Rename the file topack.mcmeta. Ensure that file extensions are visible so you can properly change the extension (e.g., from.txtto.mcmeta). -
Edit the File:
- Open the file with a text editor and add the following code for your datapack to function properly:
pack_format Values
| Version | Value |
|---|---|
| 1.16.5 | 6 |
| 1.17.x | 7 |
| 1.18.2 | 8 |
| 1.19.2 | 9 |
| 1.20.1 | 15 |
| 1.21.1 | 48 |
Making the folder path
To set up the folder structure, follow these steps. Each folder or file must be nested inside the previous one as per the hierarchy shown below:
data "modid" capabilities "type" "registryname".json -
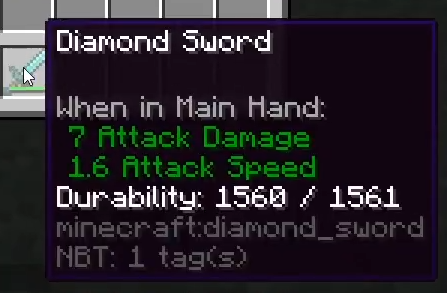
modid: The mod ID is usually the name of the mod. You can often find it by checking in-game item tooltips (pressF3 + Hto enable Advanced Tooltips) or by looking at commands or messages related to the mod.
For example, if the tooltip for an item showsmodid:itemname, the part before the colon(modid)is what you’ll use to name the"modid"folder.
-
type: This refers to the category of the item you’re configuring. Use eitherweaponsorarmors.
-
registryname: To locate an item’s registry name, pressF3 + Hin-game to enable Advanced Tooltips. Then, hover over the item to view its registry name.
Tip
When you create the registryname.json file under the referenced file directory, make sure the file extension is changed from .txt to .json
Handling Special Cases
If the weapon's registry name includes unexpected characters like slashes (/), such as in: "bloodandmadness:weapons/hunter_axe"
You can represent the slashes in the folder structure by splitting the name into separate folders.
For instance, the example above would translate into the following hierarchy: data bloodandmadness capabilities weapons hunter_axe.JSON
This approach ensures that each part of the path is accurately reflected in the folder structure.
Creating the JSON file
Weapon Config
Here's a simple example of a sword config:
 {
    "type": "epicfight:sword",
    "attributes": {
        "common": {
            "armor_negation": 0.0,
                "impact": 1.1,
            "max_strikes": 1
        }
    }
 }
One/Two-Handed
Here's an example of a spear config with both one-handed and two-handed attributes:
type: Which animations it should use. Available Type Values: | Type | Style Info |
|---|---|
| axe | One-Handed |
| fist | Dual Wielding |
| hoe | One-Handed |
| pickaxe | One-Handed |
| shovel | One-Handed |
| sword | Dual Wielding |
| spear | One/Two-Handed |
| greatsword | Two-Handed |
| uchigatana | Two-Handed |
| tachi | Two-Handed |
| longsword | Two-Handed |
| dagger | Dual Wielding |
| bow | Two-Handed |
| crossbow | Two-Handed |
| trident | One-Handed |
| shield | Dual Wielding |
One-Handed: Can only be used if held in the main hand.
Two-Handed: Usable only when held in the main hand, disabling any offhand functionality.
Dual Wielding: Usable in the offhand when a weapon of the same type is equipped in the main hand.
Tip
If you want to use weapon types from other mods, such as Weapons of Miracle, ensure you update the Mod ID before the weapon type.
For example, use "coolmodid:rapier" instead of "epicfight:rapier".
attributes: Determines whether the weapon's stats change when an item is held in the offhand.
-
common: Indicates that the weapon maintains the same stats regardless of whether something is held in the offhand or if the weapon type is restricted to two-handed use. -
one_hand/two_hand: Allows the weapon to have different stats depending on whether the offhand is empty, provided the weapon type does not enforce a two-handed style.
Attribute Modifiers Overview
The next few attribute values are added to their base values.
armor_negation: Determines the percentage of damage unaffected by defense points. (base value: 0.0)
impact: Increases the stun duration applied to the hit target. (base value: 0.5)
max_strikes: Specifies the maximum number of enemies that can be hit in a single swing. (base value: 1.0)
damage_bonus: Increases the weapon's damage output. (base value: 0.0)
speed_bonus: Enhances the weapon's attack speed. (base value: 0.0)
Resizing collider
Adjust the collider size to ensure it aligns visually with the weapon.
Here's a simple example of an armor config:
 {
    "attributes":
    {
        ...
    },
    "collider":
    {
        "number": 3,
        "center": [0.0, 0.0, -1.0],
        "size": [0.5, 0.8, 1.0]
    }
 }
number: Defines the number of colliders interpolating between the previous pose and the current one. Higher values improve collision detection accuracy but increase computational overhead.
center: Specifies the central position of the collider.
size: Sets the x, y, and z dimensions of the collider.
Estimating the collider size purely through numerical values can be challenging. To save time, use presets as a reference. Copy the preset values and adjust the size incrementally for fine-tuning. Collider Presets
Armor file
Here's a simple example of an armor config:
stun_armor: Increases the time between stuns.
weight: Reduces the stun duration when hit, but also increases stamina consumption for skills and decreases attack speed. Items with higher attack speed will experience a more significant effect.
Finishing up the Datapack
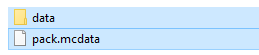
What you should have now is:
- The data folder that contains all the JSON files and other folders like capabilities.
- The pack.mcmeta file.
Preparing the Datapack for Sharing
To prepare the datapack for sharing, follow these steps to zip it using 7-Zip:
- Place the data folder and the pack.mcmeta file in a new folder. Preferably name the folder "datapack"
- Select both the
datafolder and thepack.mcmetafile. - Right-click the folder and select 7-Zip > Add to archive.
- Finally, select Add to
"datapack.zip"(make sure the.zipfile format is selected)
Then right-click, go under 7-Zip, and click on add to "datapack.zip".
To enable your datapack, follow these steps:
-
Place the Datapack in the World Folder:
- Navigate to your Minecraft world's folder.
- Inside the world folder, open the datapacks folder.
- Move or copy the zipped datapack (e.g.,datapack.zip) into the datapacks folder. -
Enable the Datapack:
- If you're creating a new world, you can enable the datapack by selecting it in the "Datapacks" menu when creating the world.
- If the datapack is zipped, unzip it by extracting it into the datapacks folder.
- Then, either launch Minecraft and load the world, or use the following command in-game to enable the datapack: -
Check if the Datapack is Active:
- This will display all active datapacks in your world.
- You can check if the datapack is enabled by using the command:
Now your datapack should be enabled, and you can start using its features in the world!