Getting started
If you're a mod developer looking to add Epic Fight compatibility, this guide will help you get started.
Setting up your Gradle Build
To integrate EpicFight into your mod project via Gradle and enable automatic downloading, add the Modrinth Maven repository. This allows you to declare EpicFight mod as a dependency directly in your build.gradle (or build.gradle.kts).
Add Modrinth maven repository
NeoForge 1.21.1
Forge 1.20.1
Tip
A repository is a storage location where your Gradle project fetches libraries using Maven-style coordinates (group:artifact:version).
You can also use Curse Forge repository instead of Modrinth repository.
Add Epic Fight mod dependency
Forge 1.20.1
How to choose a version...
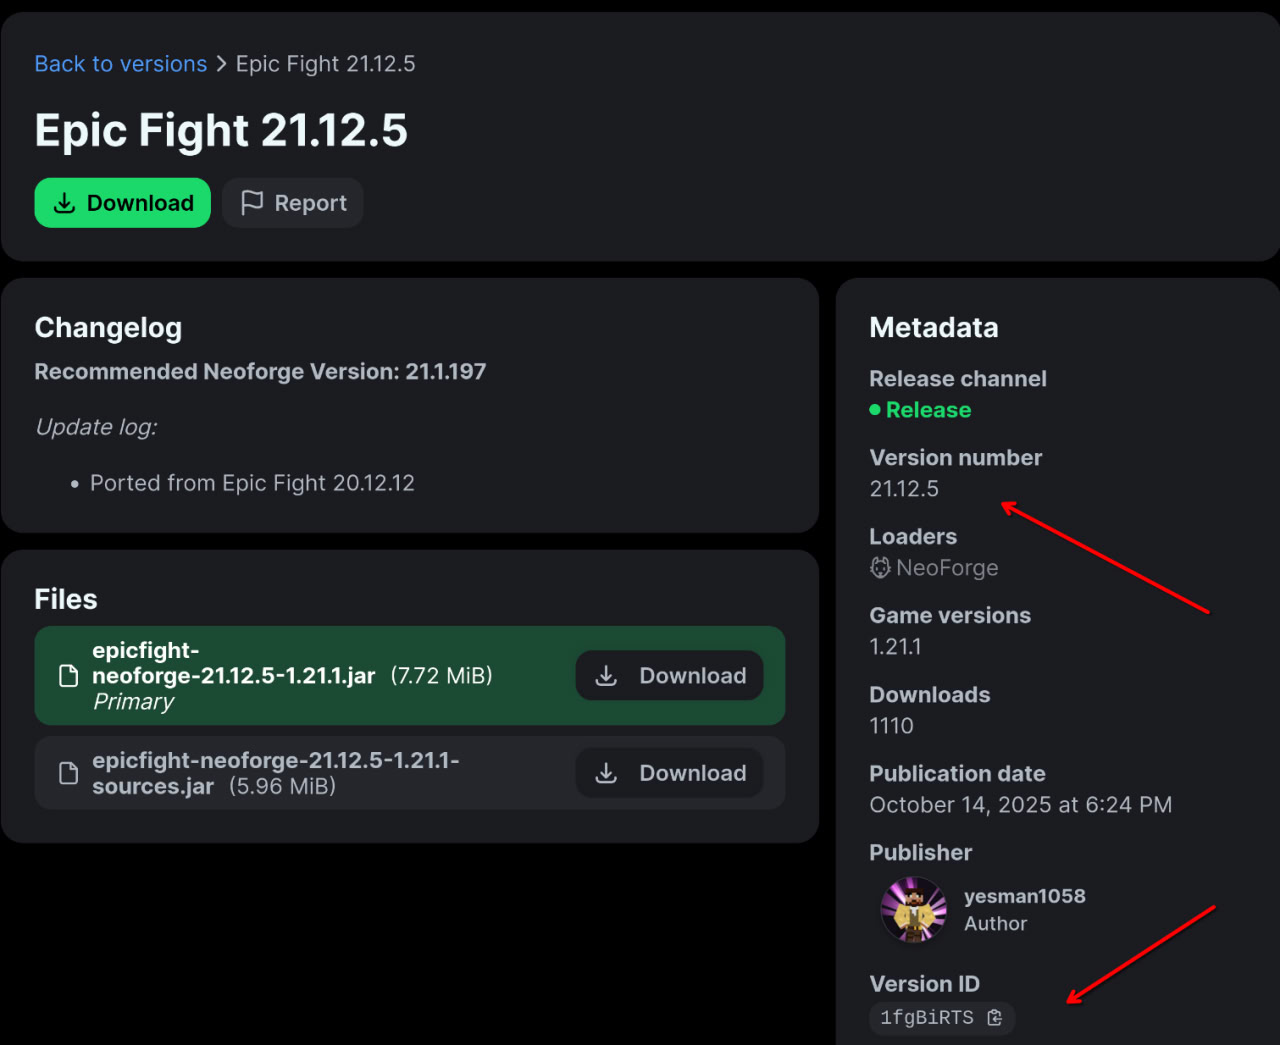
To access a compilation of EpicFight versions at your disposal, refer to the listings on Modrinth
Tip
For an easier setup of your dependencies, you can click on the version you want to use on Modrinth, then copy either the Version Number or Version ID as the Epic Fight version.
For example, 21.12.5; then include it in gradle.properties:
Forge / NeoForge Events
Epic Fight event packages by version:
| Version | API Path |
|---|---|
| 1.20.1 (Forge) | epicfight/api/forgeevent |
| 1.21.1 (NeoForge) | epicfight/api/neoevent |
Tip
The paths above are shortened. The actual package root is yesman/epicfight/api/..., but we write it as epicfight/api/... for clarity.
Registering Custom Animations
You can download the Epic Fight Player Animation Rig
and use it in [Blender] to create animations for the Epic Fight player.
Once you're done, export them using the Epic Fight Blender Exporter Add-on.
Animations made with the Epic Fight Player Animation Rig can be applied to any biped (humanoid) entity.
However, they are not compatible with non-humanoid entities such as the Ender Dragon.
Tip
For more information, refer to
Starting with Blender 2.79.
To import your animations into your mod / resource pack, follow the instructions on Asset Importing page.
Here is an example of how to register your custom animations:
import yesman.epicfight.api.animation.AnimationManager.AnimationRegistryEvent;
import yesman.epicfight.api.animation.AnimationManager.AnimationAccessor;
import yesman.epicfight.gameasset.Armatures.ArmatureAccessor;

@EventBusSubscriber(modid = YourMod.MOD_ID)
public class Animations {
    @SubscribeEvent
    public static void registerAnimations(AnimationRegistryEvent event) {
        event.newBuilder(YourMod.MOD_ID, Animations::build);
    }

    // Animation accessors for different animation types
    public static AnimationAccessor<StaticAnimation> BIPED_IDLE;
    public static AnimationAccessor<MovementAnimation> BIPED_WALK;
    public static AnimationAccessor<StaticAnimation> BIPED_FLYING;

    public static AnimationAccessor<ComboAttackAnimation> TRIDENT_AUTO1;
    public static AnimationAccessor<ComboAttackAnimation> TRIDENT_AUTO2;
    public static AnimationAccessor<ComboAttackAnimation> TRIDENT_AUTO3;

    // Define the actual animations and their properties
    private static void build(AnimationManager.AnimationBuilder builder) {
        ArmatureAccessor<HumanoidArmature> armatureAccessor = Armatures.BIPED;

        BIPED_IDLE = builder.nextAccessor("biped/living/idle", (accessor) -> new StaticAnimation(true, accessor, armatureAccessor));
        BIPED_WALK = builder.nextAccessor("biped/living/walk", (accessor) -> new MovementAnimation(true, accessor, armatureAccessor));
        BIPED_FLYING = builder.nextAccessor("biped/living/fly", (accessor) -> new StaticAnimation(true, accessor, armatureAccessor));

        TRIDENT_AUTO1 = builder.nextAccessor("biped/combat/trident_auto1", (accessor) -> new ComboAttackAnimation(0.3F, 0.05F, 0.16F, 0.45F, null, armatureAccessor.get().toolR, accessor, armatureAccessor));
        TRIDENT_AUTO2 = builder.nextAccessor("biped/combat/trident_auto2", (accessor) -> new ComboAttackAnimation(0.05F, 0.25F, 0.36F, 0.55F, null, armatureAccessor.get().toolR, accessor, armatureAccessor));
        TRIDENT_AUTO3 = builder.nextAccessor("biped/combat/trident_auto3", (accessor) -> new ComboAttackAnimation(0.2F, 0.3F, 0.46F, 0.9F, null, armatureAccessor.get().toolR, accessor, armatureAccessor));
    }
}
All available animation types are listed in epicfight/api/animation/types.
Tip
This tutorial assumes you already know how to register events in Forge/NeoForge.
The example shown above works only on NeoForge.
On Forge, you need to use @Mod.EventBusSubscriber instead of @EventBusSubscriber
and explicitly specify the bus — in this case, it must be the MOD bus.
Playing the animation
Before you can play an Epic Fight animation on an entity, the entity must be patched by Epic Fight.
(See the next section for details on how to patch entities.)
The following example shows how to play the static Jump animation on an Epic Fight–patched entity when a player right-clicks it:
public class YourEntity extends PathfinderMob {
    // ...

    @Override
    public InteractionResult mobInteract(Player player, InteractionHand hand) {
        final boolean isEpicFightModLoaded = ModList.get().isLoaded("epicfight");
        if (isEpicFightModLoaded) {
            final LivingEntityPatch<?> entityPatch = EpicFightCapabilities.getEntityPatch(this, LivingEntityPatch.class);
            entityPatch.playAnimationInstantly(Animations.BIPED_JUMP);
        }
        return super.mobInteract(player, hand);
    }
}
Make sure that Epic Fight is either declared as a required dependency in your mods.toml file or that you check for its presence at runtime as shown above. This prevents crashes if the mod isn’t installed.
Patching a custom entity
This tutorial shows how to patch a custom humanoid entity for use with Epic Fight.
It assumes you already have the entity set up in vanilla Minecraft, including its registration, renderer, and attributes.
You need to register 3 different things:
- The patched entity.
- The armature type for the entity.
- The patched renderer.
Patching the entity
An example patched entity class:
public class YourEntityPatch extends HumanoidMobPatch<YourEntity> {

    public YourEntityPatch(YourEntity original) {
        super(original, Factions.VILLAGER);
    }

    @Override
    public void updateMotion(boolean b) {
        super.commonMobUpdateMotion(b);
    }

    @Override
    protected void initAI() {
        super.initAI();

        this.original.goalSelector.addGoal(
                1,
                new AnimatedAttackGoal<>(this, new CombatBehaviors.Builder<>().build(this))
        );
        this.original.goalSelector.addGoal(2, new TargetChasingGoal(this, this.getOriginal(), 1.2f, true));
        this.original.goalSelector.addGoal(3, new RandomStrollGoal(original, 1.0f));

        this.original.targetSelector.addGoal(1, new NearestAttackableTargetGoal<>(original, Player.class, true));
    }

    public void initAnimator(Animator animator) {
        super.initAnimator(animator);

        // All available living motions are listed in this enum: https://github.com/Epic-Fight/epicfight/blob/1.21.1/src/main/java/yesman/epicfight/api/animation/LivingMotions.java#L4-L6
        animator.addLivingAnimation(LivingMotions.IDLE, Animations.BIPED_IDLE);
        animator.addLivingAnimation(LivingMotions.WALK, Animations.BIPED_WALK);
        animator.addLivingAnimation(LivingMotions.RUN, Animations.BIPED_RUN);
        animator.addLivingAnimation(LivingMotions.FALL, Animations.BIPED_FALL);
        animator.addLivingAnimation(LivingMotions.SIT, Animations.BIPED_SIT);
        animator.addLivingAnimation(LivingMotions.DEATH, Animations.BIPED_DEATH);
        animator.addLivingAnimation(LivingMotions.JUMP, Animations.BIPED_JUMP);
        animator.addLivingAnimation(LivingMotions.SLEEP, Animations.BIPED_SLEEPING);
        animator.addLivingAnimation(LivingMotions.AIM, Animations.BIPED_BOW_AIM);
        animator.addLivingAnimation(LivingMotions.SHOT, Animations.BIPED_BOW_SHOT);
        animator.addLivingAnimation(LivingMotions.DRINK, Animations.BIPED_DRINK);
        animator.addLivingAnimation(LivingMotions.EAT, Animations.BIPED_EAT);
    }
}
Then, register your patched entity with EntityPatchRegistryEvent and also register its armature to avoid runtime crashes:
@EventBusSubscriber(modid = YourMod.MOD_ID)
public class YourModEvents {
    @SubscribeEvent
    public static void registerPatchedEntities(EntityPatchRegistryEvent event) {
        event.getTypeEntry().put(YourModEntities.THE_ENTITY.get(), entity -> new YourEntityPatch((YourEntity) entity));
    }

    @SubscribeEvent
    public static void commonSetup(FMLCommonSetupEvent event) {
        event.enqueueWork(YourModEvents::registerEntityTypeArmatures);
    }

    private static void registerEntityTypeArmatures() {
        Armatures.registerEntityTypeArmature(YourModEntities.THE_ENTITY.get(), Armatures.BIPED);
    }
}
Tip
On Forge 1.20.1, you must manually specify the MOD bus for EntityPatchRegistryEvent.
Patching the renderer
An example of a patched entity renderer
public class YourEntityPatchRenderer extends PHumanoidRenderer<YourEntity, YourEntityPatch, HumanoidModel<YourEntity>, YourEntityRenderer, HumanoidMesh> {
    public DummyEntityRendererEfPatch(EntityRendererProvider.Context context, EntityType<?> entityType) {
        super(Meshes.BIPED, context, entityType);
    }
}
Then, register it on the client side only using the PatchedRenderersEvent.Add event on the MOD bus:
@EventBusSubscriber(modid = YourMod.MOD_ID, value = Dist.CLIENT)
public class EpicFightClientEvents {
    @SubscribeEvent
    public static void registerPatchedEntityRenderers(PatchedRenderersEvent.Add event) {
        event.addPatchedEntityRenderer(YourModEntities.THE_ENTITY.get(), entityType -> new YourEntityPatchRenderer(
                        event.getContext(),
                        entityType
                )
        );
    }
}
Getting the patched entity
You can retrieve the patched entity instance from a vanilla entity using:
final YourEntity entity = ...;
final YourEntityPatch entityPatch = EpicFightCapabilities.getEntityPatch(entity, YourEntityPatch.class);
Registering custom skill slots
This example explains how to extend Epic Fight by adding new skill slots through your mod and using them in custom skills.
First, define an enum that declares the additional skill slots your mod introduces to Epic Fight.
Each enum constant represents a distinct slot — for example, an extra Passive or Identity slot:
public enum YourModSkillSlots implements SkillSlot {
    PASSIVE4(SkillCategories.PASSIVE),
    PASSIVE5(SkillCategories.PASSIVE),
    IDENTITY2(SkillCategories.IDENTITY),
    ;

    final SkillCategory category;
    final int id;

    YourModSkillSlots(SkillCategory category) {
        this.category = category;
        id = SkillSlot.ENUM_MANAGER.assign(this);
    }

    @Override
    public SkillCategory category() {
        return category;
    }

    @Override
    public int universalOrdinal() {
        return this.id;
    }
}
Ensure that the enum names are globally unique and not shared with other mods.
If two mods define a slot with the same name (such as Passive5), the game will crash during startup due to conflicts. Also, avoid naming your enums with existing Epic Fight skill slots,
since these built-in slots are always available and should not be redefined.
After defining the enum, register it in your mod’s constructor to make Epic Fight recognize the new slots:
@Mod(YourMod.MOD_ID)
public class YourMod {
    public static final String MOD_ID = "your_mod_id";

    public YourMod() {
        SkillSlot.ENUM_MANAGER.registerEnumCls(MOD_ID, MoreSkillSlots.class);
    }
}
Next, add translations for these slots in your assets/your_mod_id/lang/en_us.json file.
These entries control how the slot names appear in the game’s interface.
{
  "epicfight.skill_slot.passive4": "Passive 4",
  "epicfight.skill_slot.passive5": "Passive 5",
  "epicfight.skill_slot.identity2": "Identity 2"
}
Once completed, launch the game to verify that your custom skill slots are properly integrated.
You can then assign skills to these new slots and utilize them in your mod’s features.
For additional information on registering skill categories or implementing custom skill slots, refer to the
yesman.epicfight.skill package.